pie

Project 365 – Day 340 – Coconut Cream Pie

340/366

Yesterday was Easter and that means that we got to indulge in coconut cream pie. Now, coconut is not my favorite food in the world. In fact, I usually try to avoid it at all costs. I love the flavor of coconut but I really don’t care for the shaved coconut part. It just gets stuck in my teeth and yeah..

Coconut Cream Pie

But then I found finely shredded coconut! Now that was something I could get behind. It provides all the coconut flavor without the coconuty feel.

Ingredients

For the crust

  • 5 tablespoons unsweetened shredded coconut (DO NOT use finely shredded coconut here)
  • 9 graham crackers
  • 2 tablespoons sugar
  • 5 tablespoons melted butter

Filling

  • 1 14-ounce can coconut milk, well stirred
  • 1 cup whole milk
  • 1/2 cup unsweetened finely shredded coconut
  • 2/3 cup sugar
  • 1/4 teaspoon salt
  • 5 large egg yolks
  • 1/3 cup cornstarch
  • 1 1/2 teaspoon vanilla extract
  • 2 tablespoons butter, cut into 4 pieces

Directions

For the crust:

  1. Adjust oven rack to the middle position and heat oven to 325F. Spread 5 tablespoons coconut into a 9-inch glass pie plate and toast in the oven until golden brown. About 9 minute. Be sure to stir the coconut 2-3 times to prevent it from burning. When cool, reserve 1 tablespoon for garnish.
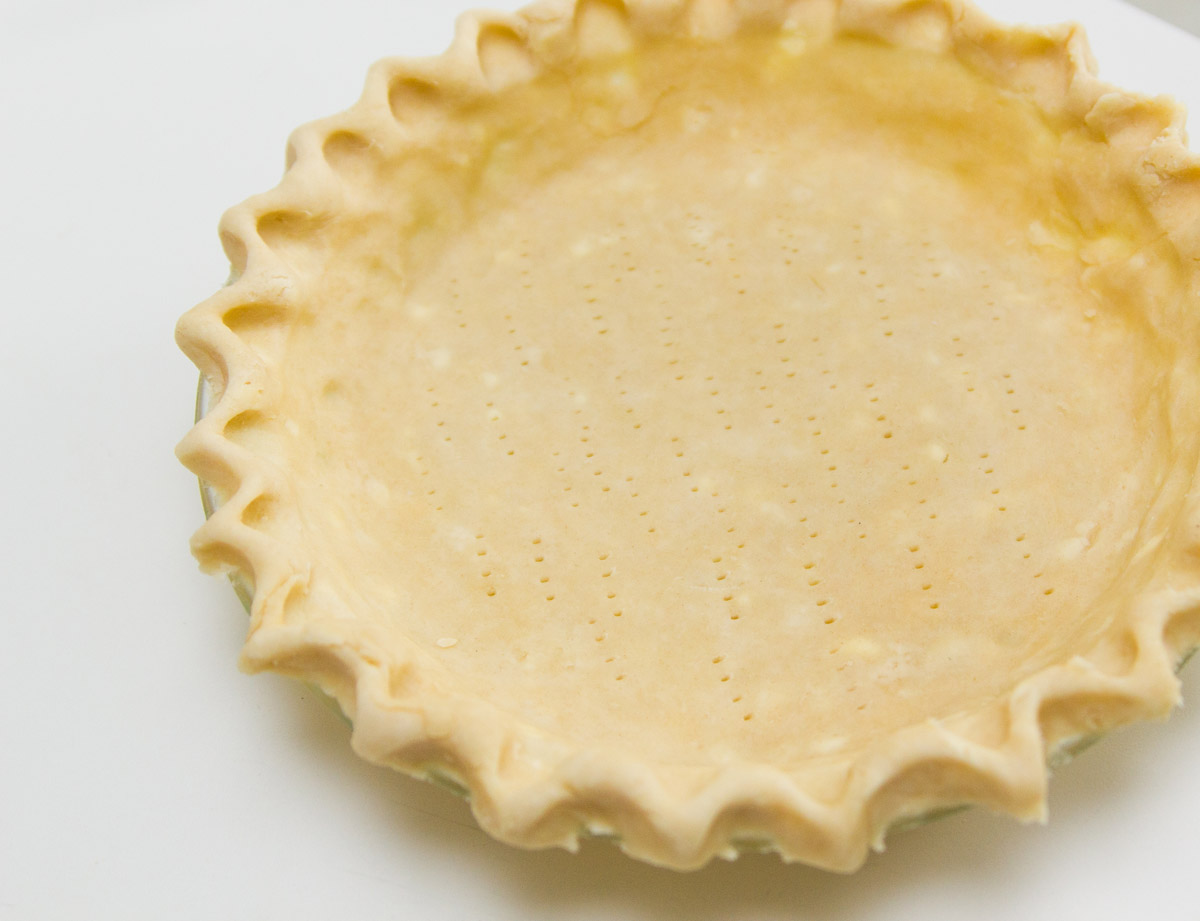
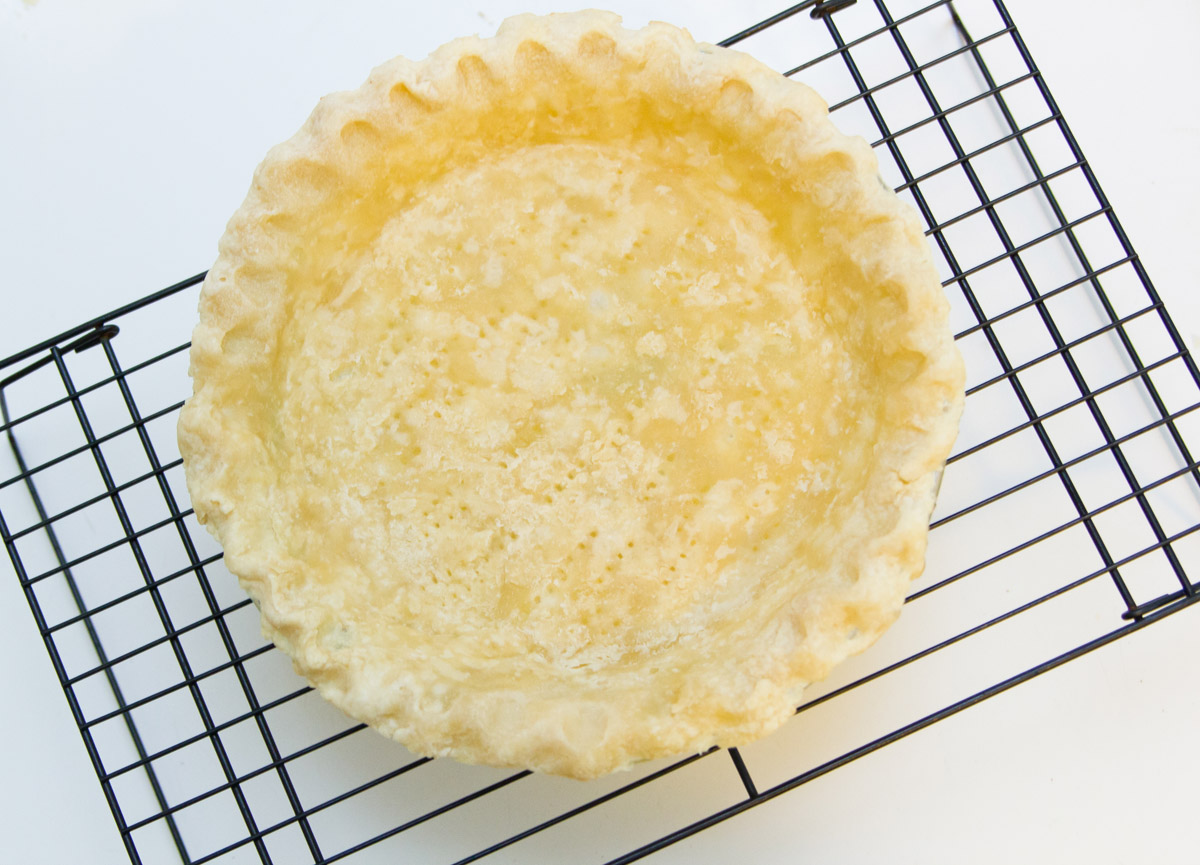
  2. Pulse the graham crackers and remaining 4 tablespoons toasted coconut in a food processor until the mixture is evenly fine crumbs. Transfer crumbs to a bowl and add the sugar. Mix to combine. Then add the melted butter and toss until the crumbs are evenly coated. Wipe out the now empty pie plate and empty the crumb mixture into it. Use the bottom of a 1/2 cup measuring cup to press the crumbs evenly into the bottom an dup the sides, forming a crust. Bake it until deep golden brown, about 22 minutes. Cool crust on a wire rack while making the filling.

For the filling:

  1. Bring the coconut milk, milk, finely shredded coconut, 1/3 cup sugar and salt to a simmer over medium-high heat, stirring occasionally with a wooden spoon to dissolve the sugar.
  2. When the mixture reaches a simmer, whisk the egg yolks in a medium bowl to break them up. Add the remaining 1/3 cup sugar and cornstarch until there are no lumps. Gradually whisk the simmering liquid into the egg mixture to temper it. Then return the mixture to the saucepan. Bring the mixture to a simmer over medium heat, whisking constantly until thickened, about 30 seconds. Off the heat, whisk in the vanilla and butter.
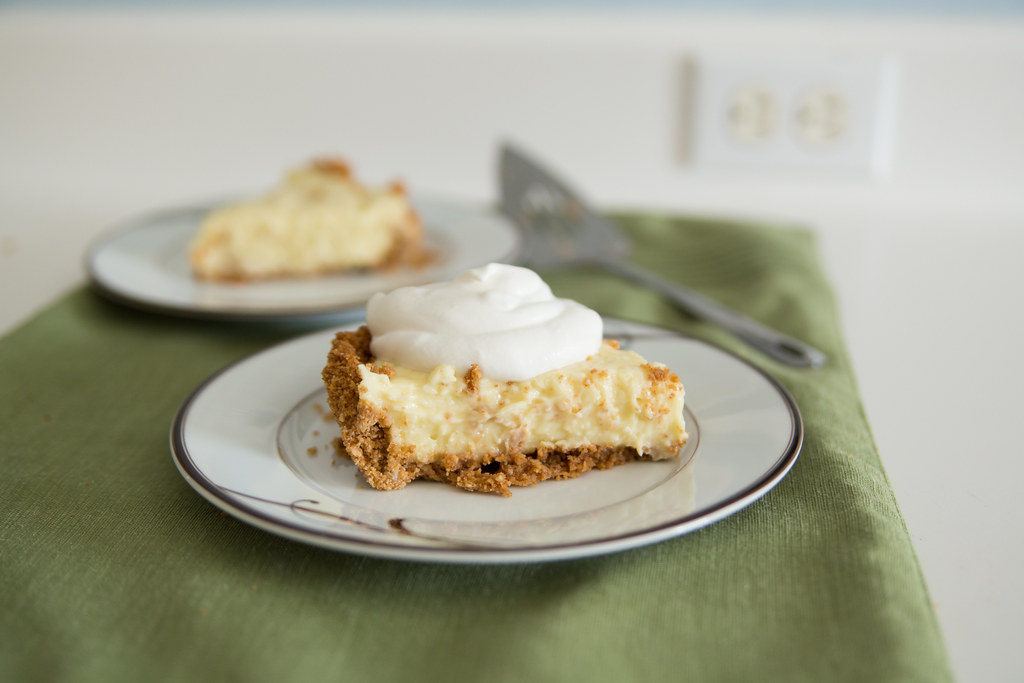
  3. Pour the filling into a cooled crust. Press a sheet of plastic wrap directly onto the surface of the filling. Refrigerate until the filling is cold and firm. At least 3 hours.
  4. To serve, spread or pipe some whipped cream over the chilled filling (you can also choose to spoon out the whipped cream as you are serving the pie) Sprinkle with remaining 1 tablespoon toasted coconut.

A Hint of Bourbon: Spiked Pumpkin Pie and Whipped Cream

Pumpkin Pie

Last night as Stephen and I were chatting over dinner, we started to talk about Thanksgiving and what we were looking forward to most. We both agreed that we could live without having turkey (or any main entrée for that matter). It’s not that we don’t enjoy turkey, and we certainly love the leftovers, we just don’t think it’s worth all the effort. Now, will we still have a turkey on Thanksgiving? Of course! But it’s not the main attraction to me.

If I had my way, I would just have stuffing with gravy and pumpkin pie. Now, I was not always a big fan of pumpkin pie, or pie for that matter. I always loved the flavor and spices that come along with pumpkin, but the texture was something less than desirable. Maybe I got used to it, maybe I grew up and just realized what I was missing, or maybe my palate changed. I don’t know, but I know that pumpkin pie has become my all time favorite part of Thanksgiving.

Stopped for a minute to tell me he's concentrating

Personally, I love pumpkin pie just by itself, but I think that what helps set this pie apart from others is the homemade bourbon whipped cream. It is simply divine. You could use whipped cream from a can, but trust me, the taste will not be the same. There is nothing like homemade whipped cream. And it has bourbon in it, so how could you go wrong?

This is when I asked him to smile

Bourbon Spiked Pumpkin Pie makes filling for one 9-inch pie (You may have a little leftover depending on the depth of your pie plate)
adapted from Bride & Groom: First and Forever Cookbook

Ingredients

  • 1 9-inch pie crust recipe
  • 1/4 cup white sugar
  • 1/2 cup brown sugar
  • 1 teaspoon kosher salt
  • 1 teaspoon ground cinnamon
  • 1/2 teaspoon ground ginger
  • 1/8 teaspoon ground cloves
  • 1/8 teaspoon freshly grated nutmeg
  • 2 eggs
  • 1 can pumpkin (15 ounces)
  • 1 1/2 cups heavy cream
  • 2 teaspoons vanilla extract
  • 1 tablespoon bourbon
  • 1 tablespoon milk

Directions

  1. Preheat the oven to 400F. Remove the pie plate from the refrigerator and pierce the bottom of the crust with a fork a few times to prevent it from bubbling. Line it with aluminum foil, folding the excess foil over the edges. Fill it with pie weights. *Note: If you do not have pie weights, you can use coins, beans or rice instead. Bake on a rimmed baking sheet on the 2nd to lowest rack in the oven for 15 minutes. Carefully remove the foil and weights, rotate the baking sheet, and bake until the crust is light golden brown, 5-10 additional minutes. Remove the pie plate and baking sheet from the oven.
  2. Adjust the oven to 425F. Stir together the sugar, kosher salt, cinnamon, ginger, cloves, and nutmeg in a small bowl. Set aside.
  3. Whisk the eggs in a large bowl. Add the pumpkin, cream, vanilla, bourbon, and the sugar-and-spice mixture and mix well.
  4. Brush the entire crust with an egg wash. Fill the shell to the rim with the pumpkin mixture. (Depending on the pie shell and the dish, you may have as much as 1/3 cup of the pumpkin mixture left over.)
  5. Bake for 15 minutes. Reduce the oven to 350F and bake until the pie is set in the center, 40 to 50 minutes more. (The filling will still jiggle when moved.) Transfer the pie to a wire rack and let it cool completely. *Note: I find that because my pie plate is pretty shallow that I only need to bake my pie for about 35 mins at 350F. But if you have a deep pie plate you may have to cook it for the 40-50 mins.

Ingredients for Bourbon Whipped Cream

  • 1 cup heavy cream
  • 3 tablespoons sugar
  • 1 tablespoon bourbon, plus more as needed

Directions for Bourbon Whipped Cream

  1. Combine the cream, sugar, and 1 tablespoon bourbon in a metal bowl. (Metal bowls will stay colder, yielding a better whip.)
  2. Beat on high until soft peaks form, about 1 minute. The cream should slowly fall over forward when lifted with a whisk.
  3. Add more bourbon, if desired.

Foolproof Pie Crust

IMG_1420

I had planned on putting this post out on the 1st day of November, but then life got in the way. Liam was getting over a cold which of course meant that I also go it. Inevitably the post was put on hold. Now that we’re all starting to feel better, and Liam is giving me a few minutes at the computer while he watches Mickey Mouse, I can finally get to sharing my Foolproof Pie Crust.

The foundation of every good pie is the crust. If your crust is lacking flakiness or isn’t very tender, then it usually doesn’t matter how delicious the rest of the filling is. This is why many people turn to pre-made frozen pie crusts. While there are some decent products on the market today, there is just something special about making your crust from scratch. 

When I was growing up, my nan would always make all of her crusts from scratch. That was just the way her generation did things. Unfortunately, I was never able to get her recipe from her, but I do have her old rolling pin. And I feel like a part of her is with me every time I make a pie. Because I didn’t have her recipe, I had to search the internet for my own. And in 2009, I came across a simple, easy and delicious recipe thanks to Cook’s Illustrated.

Traditional pie crusts are made by cutting butter or shortening into flour, and then mixing that with cold water. The trick is to not over mix the dough. The chefs at Cook’s Illustrated seem to have solved this problem by cutting the water in half, and replacing it with cold vodka. Now whether or not this truly has any effect on the texture of the crust, I can’t say. But ever since using this recipe, I have received nothing but compliments on all my pies. The best part is that you can use it for quiches, pies, tarts, or cobblers. The possibilities are endless.

In my next post, I’ll share my Bourbon-spiked Pumpkin Pie with Homemade Bourbon Whipped Cream.

IMG_0445

Foolproof Pie Crust – makes one 9-inch pie crust
Recipe from Cook’s Illustrated

Ingredients

  • 1 1/4 cups of all-purpose flour
  • 1/2 tsp salt
  • 1 tablespoon sugar
  • 6 tablespoons cold unsalted butter, cut into 1/4 inch slices
  • 1/4 cup cold vegetable shortening, cut into 2 pieces
  • 2 tablespoons cold vodka
  • 2 tablespoons cold water

Directions

  1. In a medium sized bowl, mix together 3/4 cup of the flour, salt and sugar.
  2. Cut the butter and shortening into the flour mixture using a pastry mixer. Mix until the dough starts to collect in uneven clumps. There should be no uncoated flour.
  3. Add the remaining 1/2 cup of flour and mix until the flour is incorporated with the rest of the mixture.
  4. Sprinkle the vodka and water over the mixture. Using a rubber spatula, fold the dough until it sticks together. (You may have to add more water or vodka if it doesn’t come together. I usually add water or vodka a tablespoon at a time)
  5. Flatten the dough into a 4-inch disk and wrap it in plastic. Refrigerate it at least 45 minutes or up to 2 days.
  6. Remove dough from refrigerator and roll out on a generously floured counter to a 12-inch circle, about 1/8 inch thick. Roll dough loosely around the rolling pin and unroll into your 9-inch pie plate, leaving at least 1-inch overhang. Ease dough into the plate by lifting the edge with one hand while pressing it into the plate bottom with the other hand. Leave the overhanging dough in place.
  7. Trim overhang to 1/2 inch beyond the lip of the pie plate. Fold the overhang under itself. Place the dough in the refrigerator for 15-20 minutes to firm up before fluting the edges.
  8. Remove the dough from the refrigerator and use your thumb and forefinger to flute the edges of the dough. Cover with plastic and return dough to the refrigerator for 30 minutes.
  9. Your dough is now ready to be blind baked if making a custard style pie. Blind baking usually isn’t necessary when making fruit pies.